Step 3: Creating a Flask API
You’re we’re now ready to create our Flask API, and we’re going to use flaskerize to do most of this for us.
flaskerize has a number of generators that generate code and configuration for us. These generators use schematics to define exactly what code should be built. There are a number of schematics build into flaskerize.
We’re going to start by using the flask-api generator to create a simple Flask API.
From the root of your project folder, run the following command:
fz generate flask-api my_app
You’ll see output similar to the following:
$ fz generate flask-api my_app
Flaskerizing...

Flaskerize job summary:

        Schematic generation successful!
        Full schematic path: flaskerize/schematics/flask-api


        13 directories created
        40 file(s) created
        0 file(s) deleted
        0 file(s) modified
        0 file(s) unchanged

CREATED: flaskerize-example/.pytest_cache
CREATED: flaskerize-example/.pytest_cache/v
CREATED: flaskerize-example/.pytest_cache/v/cache
CREATED: flaskerize-example/my_app
CREATED: flaskerize-example/my_app/__pycache__
CREATED: flaskerize-example/my_app/app
CREATED: flaskerize-example/my_app/app/__pycache__
CREATED: flaskerize-example/my_app/app/test
CREATED: flaskerize-example/my_app/app/test/__pycache__
CREATED: flaskerize-example/my_app/app/widget
CREATED: flaskerize-example/my_app/app/widget/__pycache__
CREATED: flaskerize-example/my_app/commands
CREATED: flaskerize-example/my_app/commands/__pycache__
CREATED: .gitignore
CREATED: .pytest_cache/.gitignore
CREATED: .pytest_cache/CACHEDIR.TAG
CREATED: .pytest_cache/README.md
CREATED: .pytest_cache/v/cache/lastfailed
CREATED: .pytest_cache/v/cache/nodeids
CREATED: .pytest_cache/v/cache/stepwise
CREATED: my_app/README.md
CREATED: my_app/__pycache__/manage.cpython-37.pyc
CREATED: my_app/__pycache__/wsgi.cpython-37.pyc
CREATED: my_app/app/__init__.py
CREATED: my_app/app/__pycache__/__init__.cpython-37.pyc
CREATED: my_app/app/__pycache__/config.cpython-37.pyc
CREATED: my_app/app/__pycache__/routes.cpython-37.pyc
CREATED: my_app/app/app-test.db
CREATED: my_app/app/config.py
CREATED: my_app/app/routes.py
CREATED: my_app/app/test/__init__.py
CREATED: my_app/app/test/__pycache__/__init__.cpython-37.pyc
CREATED: my_app/app/test/__pycache__/fixtures.cpython-37.pyc
CREATED: my_app/app/test/fixtures.py
CREATED: my_app/app/widget/__init__.py
CREATED: my_app/app/widget/__pycache__/__init__.cpython-37.pyc
CREATED: my_app/app/widget/__pycache__/controller.cpython-37.pyc
CREATED: my_app/app/widget/__pycache__/interface.cpython-37.pyc
CREATED: my_app/app/widget/__pycache__/model.cpython-37.pyc
CREATED: my_app/app/widget/__pycache__/schema.cpython-37.pyc
CREATED: my_app/app/widget/__pycache__/service.cpython-37.pyc
CREATED: my_app/app/widget/controller.py
CREATED: my_app/app/widget/interface.py
CREATED: my_app/app/widget/model.py
CREATED: my_app/app/widget/schema.py
CREATED: my_app/app/widget/service.py
CREATED: my_app/commands/__init__.py
CREATED: my_app/commands/__pycache__/__init__.cpython-37.pyc
CREATED: my_app/commands/__pycache__/seed_command.cpython-37.pyc
CREATED: my_app/commands/seed_command.py
CREATED: my_app/manage.py
CREATED: my_app/requirements.txt
CREATED: my_app/wsgi.py
Navigate into the my_app directory that was just created and list the files in that directory:
$ cd my_app
$ ls -al
total 32
drwxr-xr-x  9 bob  staff   288  4 Oct 15:01 .
drwxr-xr-x  6 bob  staff   192  4 Oct 15:01 ..
-rw-r--r--  1 bob  staff  1063  4 Oct 15:01 README.md
drwxr-xr-x  4 bob  staff   128  4 Oct 15:01 __pycache__
drwxr-xr-x  9 bob  staff   288  4 Oct 15:01 app
drwxr-xr-x  5 bob  staff   160  4 Oct 15:01 commands
-rw-r--r--  1 bob  staff   673  4 Oct 15:01 manage.py
-rw-r--r--  1 bob  staff   409  4 Oct 15:01 requirements.txt
-rw-r--r--  1 bob  staff   141  4 Oct 15:01 wsgi.py
As you can see, a number of files and folders have been created.
One of the files that was just created is a README.md markdown file.
If you open that file in a text editor find instructions on settng up your API.
Those instructions are repeated here for convinience, but I’d recommend you take a look at README.md file regardless.
Following the Instructions from README.md
First, use pip install to install the requirements of your new API
pip install -r requirements.txt
Next, initialize the database
python manage.py seed_db
This step create a local SQLite database file.
Note
Type “Y” to accept the message. This check is there to prevent you accidentally deleting things.
Confirm your API is working
You’re now ready to confirm that your API is working.
You can use the Flask command line interface to confirm that your Flask API is working by first using the flask routes command.
This will print out all of the routes supported by your Flask API:
$ flask routes
Endpoint                   Methods           Rule
-------------------------  ----------------  --------------------------
Widget_widget_id_resource  DELETE, GET, PUT  /api/widget/<int:widgetId>
Widget_widget_resource     GET, POST         /api/widget/
doc                        GET               /
health                     GET               /health
restx_doc.static        GET               /swaggerui/<path:filename>
root                       GET               /
specs                      GET               /swagger.json
static                     GET               /static/<path:filename>
As you can see, a number of routes have been generated.
Now, you can run your Flask API using flask run or by running python wsgi.py:
$ python wsgi.py
* Serving Flask app "app" (lazy loading)
* Environment: production
  WARNING: This is a development server. Do not use it in a production deployment.
  Use a production WSGI server instead.
* Debug mode: on
* Running on http://127.0.0.1:5000/ (Press CTRL+C to quit)
* Restarting with stat
* Debugger is active!
* Debugger PIN: 304-898-518
While the Flask app is running, open http://127.0.0.1:5000/health within your favourite browser, and you should be greated with the Swagger documentation for your API.
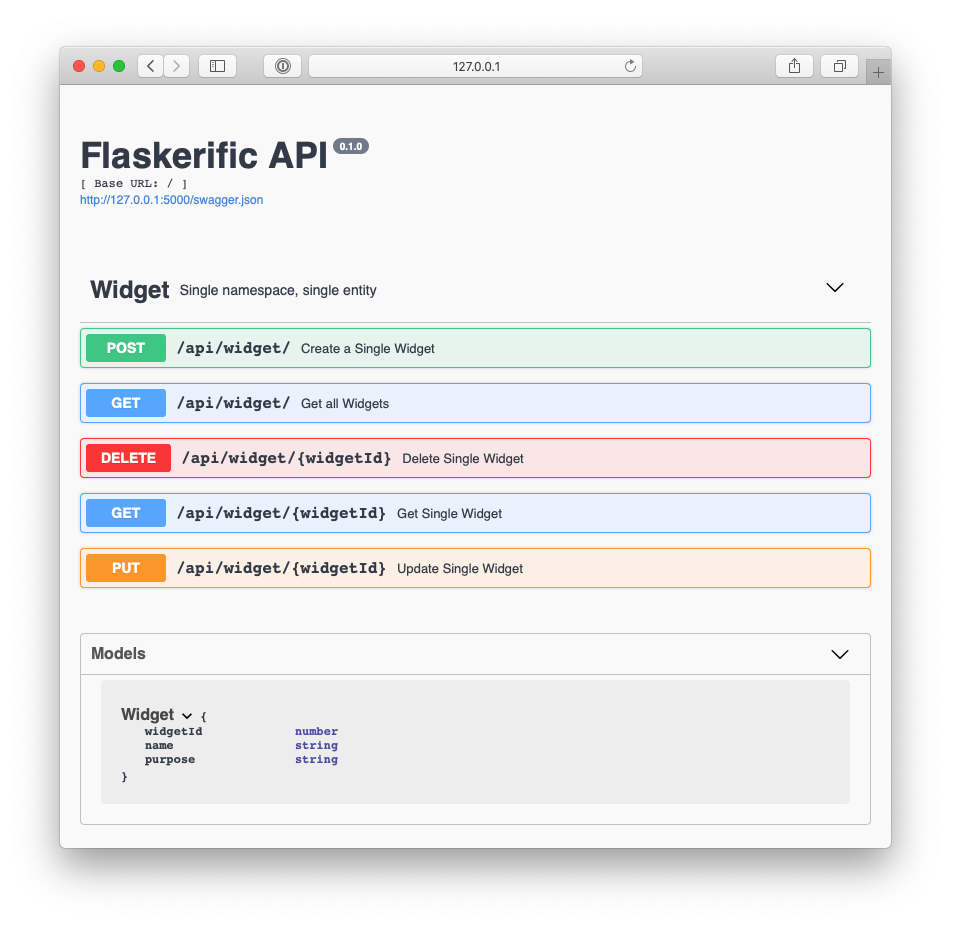
You can use this UI to try getting all of the Widgets from your API.
Alternatively, you can use the command line to call your api using curl.
Execute the following command:
curl -X GET "http://127.0.0.1:5000/api/widget/" -H "accept: application/json"
This should return a JSON response, containing the entity details for the 3 Widgets currently stored in your SQL Lite database.
$ curl -X GET "http://127.0.0.1:5000/api/widget/" -H "accept: application/json"
[
    {
        "name": "Pizza Slicer",
        "widgetId": 1.0,
        "purpose": "Cut delicious pizza"
    },
    {
        "name": "Rolling Pin",
        "widgetId": 2.0,
        "purpose": "Roll delicious pizza"
    },
    {
        "name": "Pizza Oven",
        "widgetId": 3.0,
        "purpose": "Bake delicious pizza"
    }
]
What Now?
flaskerize has very quickly set up a Flask API for you, including…
- the core API, and all the plumbing to set up routes
- an entity called “Widget”
- code to set up and seed a local database
- tests
In the next section we’ll dig deeper into what happened when you ran fz generate flask-api my_app, the structure of your Flask API, and what each of the generated files do.